Creating Your Game
After briefly familiarizing and customizing the scene, let's start creating its functionality.
First of all, let's add all necessary nodes to KinematicDaicon:
- Sprite2D
- Camera2D
- AnimationPlayer
- AnimationTree
- and also MeshInstance3D and CollisionShape3D.
Place Mesh and Shape in the corresponding KinematicDaicon cells:
- Click on the “assign” button in the cell parameter
- Select the desired mesh node
- Do the same for Shape
Info
Check the Core section. After filling the cells, the list of parameters assigned to them in the core was updated automatically. In addition, the number of child nodes in the core was increased by one.
If you try to click on the return to core icon, the cell and its parameter list will be empty, and the node that was in the cell earlier will return to the editor's visibility. This is the same as if you had clicked the same icon next to the cell itself.
(See “Manual : Core” for more information on the operation of the core)
Code
Navigate to the attached .gd file of your KinematicDaicon node. If you did the previous steps correctly (especially the script override is important), your code now looks like this:
@tool
extends KinematicDaicon

func _ready() -> void:
    super._ready()

func _process(delta: float) -> void:
    super._process(delta)

func _physics_process(delta: float) -> void:
    if not Engine.is_editor_hint():
        #LOGIC

        #LOGIC END

        #d3.move_and_slide()
        #update_pos()
        pass

func _validate_property(property: Dictionary) -> void:
    super._validate_property(property)
The functions “_ready”, “_process” and “_validate_property” contain the “super” construct. It calls these same functions from the root file of the node you have overridden. So this code uses the functionality of its parent node without changing it in any way.
Now let's add the logic and animation system:
@tool
extends KinematicDaicon

const SPEED = 5
const JUMP_VELOCITY = 5
const gravity = 10
const accelaration = 20
@onready var animation_tree : AnimationTree = $AnimationTree
@onready var animation = animation_tree.get("parameters/playback")

var movement_input := Vector2.ZERO

func _ready() -> void:
    super._ready()

func _process(delta: float) -> void:
    super._process(delta)

func _validate_property(property: Dictionary) -> void:
    super._validate_property(property)

func _physics_process(delta: float) -> void:
    if not Engine.is_editor_hint():
        movement_input = Input.get_vector("ui_left", "ui_right", "ui_up", "ui_down")
        var direction := Vector3(movement_input.x, 0, movement_input.y).normalized()
        if direction != Vector3.ZERO:
            set_animation_direction(movement_input)

        var y_vel = d3.velocity.y
        d3.velocity = d3.velocity.move_toward(direction * SPEED, accelaration * delta)
        d3.velocity.y = y_vel - gravity * delta

        if Input.is_action_just_pressed("ui_accept") and d3.is_on_floor():
            d3.velocity.y += JUMP_VELOCITY

        d3.move_and_slide()
        player_animation(direction, d3.velocity)
        update_pos()

func player_animation(direction, d3_velocity):
    if d3_velocity == Vector3.ZERO:
        animation.travel("Idle")
    elif d3_velocity != Vector3.ZERO:
        if direction:
            if d3.is_on_floor():
                animation.travel("Move")
            else:
                animation.travel("Jump")
        else:
            if not d3.is_on_floor():
                animation.travel("Jump Down")

func set_animation_direction(direction):
    animation_tree.set("parameters/Idle/blend_position", direction)
    animation_tree.set("parameters/Move/blend_position", direction)
    animation_tree.set("parameters/Jump/blend_position", direction)
    animation_tree.set("parameters/Jump Down/blend_position", direction)
StaticDaicon - AnimatedDaicon
For static objects, use the StaticDaicon and AnimatedDaicon nodes. Their differences can be compared to the differences between StaticBody and AnimatedBody.
The principle of configuration and functioning of both nodes is similar to KinematicDaicon.


RigidDaicon
For objects with complex physics, there is RigidDaicon.

DaiconShadow
The DaiconShadow node is a 2D sprite with a built-in CharacterBody3D core. It receives the parent daikon node as input and creates a shadow under the object using its core data.

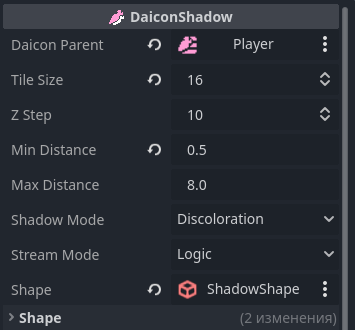
- Place the input node in the Daicon Parent parameter (this node will cast the shadow)
- The tile_size and z_step parameters are automatically synchronized with the parent
- Set the min_distance and max_distance values (see the “Node Reference: DaiconShadow” section)
- Select Shadow Mode - shadow modulation mode (Fade and saturation)
- Select Stream Mode - the behavior mode of the physical body of the core (see section “Node Reference: DaiconShadow”)
- Add Shape (shape.size.y = 0 - this will create the necessary flat collision model)
Next, the Shape section is used to dynamically change the shadow collisions and is not required after the settings are complete - the shadow is ready.
Shaders
The main purpose of the Daicon root node is to draw shaders.
On the node parameters panel, there are two lists: triggers and targets.
- Triggers are nodes that contain shader design mechanisms in the kernel, such as ShaderCast.
- Targets are nodes that receive information from triggers and draw a shader at the coordinates specified for them.
Daicon handles dynamic updating of effects, sorting lists, and analyzing the state of triggers.
!!!Info. The plugin also provides basic shaders, which you can find in the addon directory, in the “shaders” folder.
Select the environment nodes that will use the shader. For DaiconMap, in case layers have been extracted, the shader should be put for each such layer separately.
Now it is enough to fill in the list of triggers and targets, and the customization is complete.